Google Brings Hashtags To Search Results To Highlight Google+

Google’s latest attempt to bring the social networking side of Google+ into relevancy was revealed yesterday with updated search functionality that now allows user to search for hashtag terms in Google’s search engine.

The catch is that these results displayed are only being pulled from Google+ posts that are thematically relevant to the hashtag being queried, in a bid to continue to bring prominence and visibility to the social network. Read more

Google’s “In-Depth Article” feature showcases quality content

Users often turn to Google to answer a quick question, but research suggests that up to 10% of users’ daily information needs involve learning about a broad topic.  These users are looking for detailed information.  That is why on August 6, 2013 Google introduced new search results to help users find these “in-depth articles”.

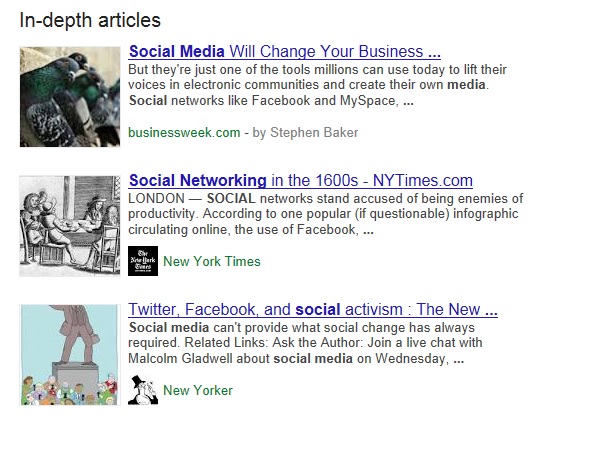
When you’re searching on Google for a person or organization name, or other broad topic, you’ll now start to find a block of search results labeled “In-depth articles”.  The listings for these “In-depth articles” are typically on the bottom of the first page of Google results.  These results provide high-quality content to help you learn about or explore a subject.  While the feature is based on algorithmic signals, there are steps you can take as a webmaster to help Google find your high-quality, in-depth content and best present it to users in the search results.
InDepth2Your Content Strategy

If you are an online  newspaper who publishes content, or you are a re-publisher of syndicated content, then you should utilize the new Google “In-depth article” feature.   Articles between 2000 and 5000 words seem to be best for inclusion in these results.  The idea is that these articles should be the sort of content that will remain relevant for months after publication.  Make sure that your content touches on every angle of the article’s topic.

These results are ranked algorithmically based on many signals that look for high-quality, in-depth content.  You can help their algorithms understand your pages better by using schema article markup.  Following these practices along with Google’s webmaster guidelines helps Google to better understand your website’s content, and improves the chances of it appearing in this new set of search results.

In-depth article Inclusion

The best way to be included in the Google “in-depth article” feature is to useSchema.org Article markup.  In general, Google will do their best to understand the metadata you provide for your pages to better present search results to users.  For this feature, it’s particularly helpful if you can implement certain aspects of the schema.org Article markup, notably the following attributes:

  • headline
  • alternativeHeadline
  • SEO title tag
  • image (note: the image must be crawlable and indexable)
  • description
  • datePublished
  • articleBody

Authorship markup helps Google’s algorithms find and present relevant authors and experts in Google search results.  For multi-part content, proper pagination markup using rel=next and rel=prev can help Google’s algorithms correctly identify the extent of those articles.  In addition, it’s important that canonicalization is done correctly, with a rel=canonical pointing at either each individual page, or a “view-all” page (and not to page 1 of a multi-part series).

A logo is also a great way help users recognize the source of an article with a quick glance.  As a webmaster, there are two ways you can give Google a hint about which logo to use for your website:

  1. Create a Google+ Page and link it to your website.  Choose an official logo or icon as the default image.
  2. Use organization markup to specify your logo.  For example:

<div itemscope itemtype=”http://schema.org/Organization”>

<a itemprop=”url” href=”http://www.example.com/”>Home Advance</a>

<img itemprop=”logo” src=”http://www.example.com/logo.png” />

</div>

See Google Webmaster Tools for more detailed information on how to possibly appear in the” In-depth article” results.

In Closing

Make sure that you create meaningful, original, well-researched and thorough content in your articles.  You also need to make sure that your article has keyword relevance.  This should put you on the road for inclusion in Google’s “in-depth articles”.

Google’s rel=publisher tag is for all business and brand websites, not just publishers

Shortly after Google+ was launched back in 2011, Google introduced two tags to be used to help form a verified link between websites and Google+: Rel=Author and Rel=Publisher. The first, Rel=Author, has garnered increasing attention and adoption over the past two years. This tag allows content creators to form a connection between their individual articles and their personal Google+ profile which has been dubbed Authorship by Google. If you are a writer and haven’t set up your rel=author tag yet, Google has provided an easy walkthrough on how to do this.

For webmasters that want to form a verified connection overall between their website and Google+ the second tag, Rel=Publisher, is the avenue to provide just that. This tag has seen a much smaller adoption rate when compared against Rel=Author, and its name may have something to do with that. The “Publisher” terminology is a misnomer and while one might think the tag is relevant only to publishing-focused websites that produce a lot of content, the truth is that the tag can be used by any business or brand website that has a corresponding Google+ page.

Implementing the Rel=Publisher Tag

The tag is relatively easy to setup, and only requires a few links added to both your website and Google+ Page. First and foremost, if your website doesn’t have a corresponding Google+ page supporting it, you’ll need to create a page. Next, you’ll need to add a link from the page to the website. This is completed through the following actions: go to your Google+ page, click “Manage Your Page” and then “Add Your Website”. When completed the About section of your page should have a Links area that look like this:

google-rel-publisher-1Next, you’ll need to edit your site to complete the connection. This can be done one of two ways. First, you can add a link tag in the Head section of your website with the following setup:

<link href=”[Your Google+ Page URL]” rel=publisher />

The second, and arguably easier setup, is to modify the link you should have on your website pointing to your Google+ page. Whether that link is a text link or an icon link, the basic link setup remains the same:

<a href=”[Your Google+ Page URL]” rel=”publisher”>Google+</a>

Once you’ve completed this update on the site, you can verify that the connection has been completed by checking your website against Google’s Rich Snippet Tool and you should see the Publisher markup has been verified. When you see the verification (which should be instantaneous) there is nothing else you need to do, but sit back and wait for Google to officially recrawl your page and index this connection

google-rel-publisher-2The Benefits of Rel=Publisher

At the moment, there is limited perceived value that Rel=Publisher provides a website. Currently, its biggest contribution to a website is that when branded search queries are made in Google, the Knowledge Graph for that query should display a widget for that brand’s corresponding Google+ page which includes:

  • The name of the Google+ Page
  • How many followers the page has
  • The last update from the page and when
  • Option to start following the page, if the user is logged in

For businesses that have a physical location and have that data properly filled out on their corresponding Google+ page, having the Rel=Publisher tag implemented may also help to ensure that this data is correctly displayed in the Knowledge Graph.

Other than this benefit, there remains only speculation as to what the Rel=Publisher tag can or will do for a website. Google has been increasing the value they put behind the Rel=Author tag as part of their algorithm for ranking content, and there is speculation that the Rel=Publisher tag will eventually be used to further refine Google’s SERPs. The Rel=Publisher tag may also be used as a unifying factor between multiple Rel=Author tagged profiles on a single domain, meaning that the more high value authors are associated with a website, the better that site may do on a whole in search.

For now, remember that your website should be correctly using both Rel=Publisher and Rel=Author tags if applicable. Think of the Rel=Publisher tag as a yellow pages listing for a business, and the Rel=Author tag as business cards for individuals. Both serve different purposes but are both important for the business to succeed.